|Anazawa
ブログ技術XR

どうも穴澤です。
先日「Image Tracking」サンプルの認識画像を変更してみて、他の画像を認識させました。
今回は表示するオブジェクトをサンプルの恐竜から変更してみようと思います。
表示されるキャラクターのオブジェクトを作ります
画像(マーカー)を認識したときに表示される3Dオブジェクトを変更したいと思います。
今回表示する3Dオブジェクトは、大阪といえばこのキャラクターでしょう。

作り方は簡単です。
弊社の代表が趣味で作っていたので、いただきました。
※参考ツイート
ミャクミャク様、四ツ橋筋北上中 pic.twitter.com/BiFuFruHz2
— Ozaki Satoshi/株式会社Qukuri 代表取締役 (@OzakiSatoshiQ) June 22, 2024
任意の3Dオブジェクトを表示させる
前回のサンプルソースを修正します。
前回
<body style="margin : 0px; overflow: hidden;">
  <!-- minimal loader shown until image descriptors are loaded -->
    Loading, please wait...
  <a-scene
    vr-mode-ui="enabled: false;"
    renderer="logarithmicDepthBuffer: true; precision: medium;"
    embedded
    arjs="trackingMethod: best; sourceType: webcam;debugUIEnabled: false;"
  >
    <!-- we use cors proxy to avoid cross-origin problems ATTENTION! you need to set up your server -->
    <a-nft
      type="nft"
      url="https://xxx.github.io/namecard/work/material/marker/namecard"
      smooth="true"
      smoothCount="10"
      smoothTolerance=".01"
      smoothThreshold="5"
    >
      <a-entity
        gltf-model="https://raw.githack.com/AR-js-org/AR.js/master/aframe/examples/image-tracking/nft/trex/scene.gltf"
        scale="5 5 5"
        position="150 300 -100"
      >
      </a-entity>
    </a-nft>
    <a-entity camera></a-entity>
  </a-scene>
</body>
今回
<body style="margin : 0px; overflow: hidden;">
  <!-- minimal loader shown until image descriptors are loaded -->
    Loading, please wait...
  <a-scene
    vr-mode-ui="enabled: false;"
    renderer="logarithmicDepthBuffer: true; precision: medium;"
    embedded
    arjs="trackingMethod: best; sourceType: webcam;debugUIEnabled: false;"
  >
    <!-- we use cors proxy to avoid cross-origin problems ATTENTION! you need to set up your server -->
    <a-nft
      type="nft"
      url="https://xxx.github.io/namecard/work/material/marker/namecard"
      smooth="true"
      smoothCount="10"
      smoothTolerance=".01"
      smoothThreshold="5"
    >
      <a-entity
        gltf-model="https://xxx.github.io/namecard/work/material/mkmk.gltf"
        scale="5 5 5"
        position="150 300 -100"
      >
      </a-entity>
    </a-nft>
    <a-entity camera></a-entity>
  </a-scene>
</body>
変更点は46行目を作成したgltfファイルに置き換えるだけです。
scaleやpositionは作成したオブジェクトによるので適当に調整してください。
試してみよう
名刺をカメラで読み取るとミャクミャク様が出てきたので成功です。
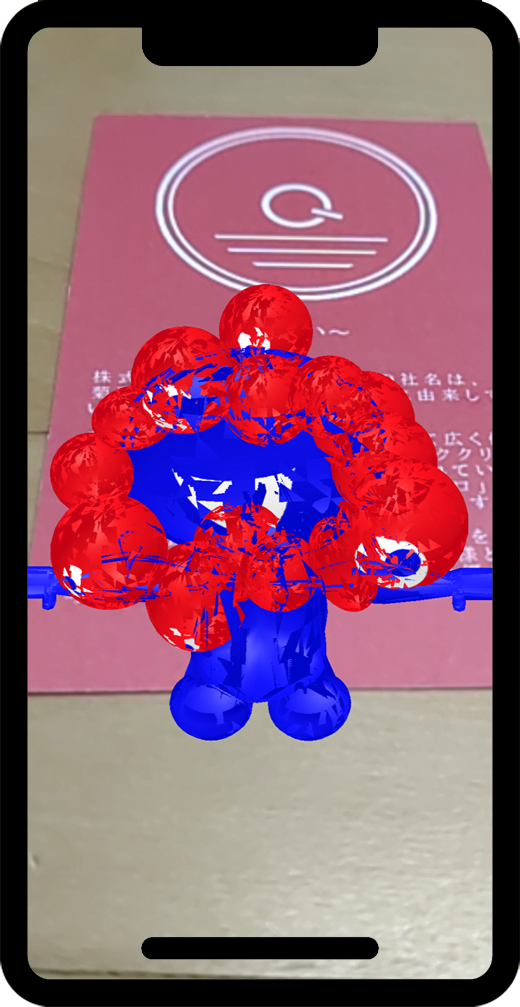
※AR.jsの設定なのか分かりませんが、オブジェクトがチラチラしてより怖く可愛く表示されてしまいました。
※まだ調査する必要がありそうです。
結果
ここまでで任意の画像を認識すると、任意のオブジェクトを表示することができました。
WebARにはまだ場所をトリガーにする「Location Based」や、マーカーをトリガーにする「Marker Based」があります。
また機会があれば、これらにも挑戦してみたいと思います。